FAQ - Domande frequenti
How to renew/update my EasyLog version?
To upgrade the copy of EasyLog you own, simply renew our priority support, which costs €22.50 (extended through 2022).
Priority support, includes 12 months of access to our web server, from which you will be able to download all the releases that are periodically published and advanced e-mail support for problems of various kinds, but inherent to EasyLog.
At no additional cost we follow the problem through to resolution; in major cases, we offer support via TeamViewer (at our discretion) to safely resolve any complex problems. Support via TeamViewer is free until the end of 2022.
To renew with PayPal click on the following address:
How to install EasyLog:
Log on to our website, at www.easylog.com/ELUP
Enter the username and password provided when you purchased EasyLog
After a few seconds you will see the personal page of the restricted area of our website. (We call it URA.)
To download EasyLog you must click on the "Download Full Version" link.
This will download a compressed file in ZIP format named EL5_BUILD.ZIP
Please take note of the folder where the file will be saved.
Please note! the path to the folder may vary depending on the type of browser used (Internet Explorer, Firefox, Chrome) and the version of Windows.
Unzip the ZIP file (depending on your operating system, it may be sufficient to double-click the zipper file or use an external program such as WinZip).
When you have finished expanding the files in the zipper file, the folder will contain several PDF files (manuals of the latest releases, which they suggest you view) and a file named INSTALL.EXE file This file is the EasyLog installer.
Download the LOG5.DLL key file from our website by clicking on "Download key file." This file should be copied to the same directory (folder) as EasyLog (normally C: EL5).
Double-click the INSTALL.EXE file to start the installation.
Follow the on-screen instructions After the procedure, launch EasyLog and create a new Log.
IMPORTANT Starting with Windows 7 (and then Windows 8, 8.1 and 10) it is possible that EasyLog may have to be run with administrator rights. This happens if Windows has more than one user, one is the administrator and one is a user with lower rights on the PC. If you use a user with less administrator rights, once the installation is finished, it will not start. In this case, it is necessary to start EasyLog with administrator rights. To do this, simply right-click on the EasyLog icon and in the menu that will appear, select "Run as administrator."
IMPORTANT If you install the full version you just downloaded on a previous version of EasyLog, don't forget to make a full backup of your data, using the BACKUP and RESTORE program. You will find it in the EasyLog group icon.
Impossible to find CustomAward Installer.EXE
After the download, please follow the instructions on screen.
RAC error 3
IMPORTANT.
Do not enable the first item ("Use internal engine (only for RAC)") and at the same time indicate the name of the executable program, otherwise error code 3 will appear during the search.
Known interfacing problem in version 5.5.
There is an interfacing problem with the external search engine in this version. So it is important to use the internal search engine (see first image).
So select the first option ("Use internal engine (RAC only)") and indicate ONLY the name of the drive containing the CD-ROM (in the first example E:). Therefore, do not indicate the name of the external executable program!
This error appears if the settings for accessing the RAC (Radio Amateur Callbook) CD-ROM are incorrect.
Here is how EasyLog should be set up correctly:
1) from EasyLog's main menu, select the "Tools" item.
2) the "Tools" window will appear.
3) press the "Search Callsign on..." button.
Using EasyLog's internal search engine.
In this case select "Use internal engine (RAC only)" and indicate in the input field ("Path") the name of the drive containing the CD-ROM. In this example, the CD-ROM is identified by the letter E. It is most important to indicate not only the name of the drive, but also the colon and the backslash. Nothing else should be indicated following the drive name, colon and inverted slash. In our example E:.
See example:

Using the engine external to EasyLog.
In this case EasyLog will call the executable program for querying the archives on the CD-ROM.
In the case of RAC, the executable program is named CALLBOOK.EXE. If, for example, the CD-ROM has the letter E as its identifying letter, then the path to be typed in the "Path" field consists of the identifying letter and the name of the executable program.
Example: E:CALLBOOK.EXE
See example:

Communication problem with ICOM equipment
Problem with the connection between EasyLog and the ICOM 7700 radio.
By viewing the radio from EasyLog the frequency is read correctly, as well as by changing the frequency by acting on the radio's tuning knob.
However, it does not happen if I change the frequency from the program. I have tried changing the communication parameters but to no avail.
How to fix:
The problem described (which can happen with any other ICOM equipment) is almost certainly caused by an error in the configuration of the equipment code (Transceiver Address).
The EasyLog driver for the radio (EL5RADIOic-7700.rig) uses the default value 58 probably, for some reason, the radio is using a different code.
On the receiving end it works because EasyLog is more tolerant than the radio (in fact, EasyLog ignores the code) while the radio expects a specific Transceiver Address code.
Have a look at the manual to see what code the radio is currently configured with and change it back to the default code (or alternatively change the code in the ic-7700.rig driver file)
Index deletion
Description
Radio frequency abounds in our radio stations, unfortunately if the PCs are not shielded or well grounded, radio frequency can be the cause of deterioration of the indices used by EasyLog for sorting the Log QSOs.
Indexes are files that EasyLog uses to maintain a logical order on Log QSOs. The data entered for each QSO are stored in files with the extension .DBF, while the indexes are stored in files with the extension .MDX.
Possible problems
It can happen to see the QSOs in the Log window not correctly in order for the selected order. In this case the indexes in the Log must be recreated by deleting them.
How to do
The EasyLog icon group installed on your PC, contains a program named UTILITIES that allows deletion of the indexes.
After deleting the indexes, EasyLog, on restart will recreate them again.
QRB calculation
In the tests I ran I found a problem related to the distance ( QRB ) calculation with a country stations where it often gives me (for example) 500 Km even though they are close. As a counter test I entered my own callsign and was automatically placed at JN61FV at 485 Km. Is this correct?
Answer:
The program proposes the route via short and via long as well as the QRB relying for the reference of the correspondent on a locator representing the geographical center of the country, capital or call-area for larger countries. In fact, the program cannot know a priori the location of the correspondent, for our intended purpose (the rough pointing of directional antennas, this approach is effective). It is clear that within the same country the system is not reliable. However, by entering the locator of the corresponding station, and having taken care to have entered your own in the Log property window, the QRB and antenna direction calculation will be absolutely accurate.
DXCC recognition file update (CHECK.DAT)
Q: I have installed the latest CHECK update.
The problem now is that the DXCC country of QSOs already uploaded to the Log in the past (when I had the old check) keeps being seen as PITCAIRN IS instead of DUCIE I.
A: VP6DX is the prefix assigned for dispatch to DUCIE I. The validity of this prefix as DUCIE I. is limited to the days of dispatch, namely: 11/02/08 to 28/02/2008. If you enter VP6DX with today's date, or otherwise outside the validity period EasyLog 5 will determine (correctly) the country as Pitcairn I.
The installer of the CHECK updates, does not affect QSOs already at Log, except for any changes that may have been made to DXCC (such as name or prefix changes of an 'entity or addition of new entities).
By downloading the (free) updates of CHECK.DAT in a timely manner this problem does not occur, the updates are generally made available BEFORE the new prefixes become valid.
We therefore suggest that you subscribe to the easylog_check group and the EasyLog newsletter to receive timely information on the availability of new releases of the check file. For more information on subscribing, please click the following link:
Also check the CHECK updates page from time to time at the following address:
http://www.easylog.com/wiki/index.php?title=Check_Download_Page
However, if you were to enter a link to Log with a prefix not yet in the CHECK that will therefore not be recognized correctly or not at all, here is how to proceed:
1. Update the CHECK file with the latest version available, read the instructions at the following link:
http://www.easylog.com/wiki/index.php?title=Check_Download_Page
and the update installer manual at the following link:
http://www.easylog.com/CHECK/dxccupdate_ita.pdf
2. Use the 'Extract Info' or 'Extract Unassigned QSOs' option in the 'Tools' menu of EasyLog to automatically redetermine the QSO assignment to reflect the latest changes introduced by the latest installed CHECK file.
*** CAUTION ***
- 'Extract Info' acts on the entire Log, so if you have not blocked out dubious QSOs and manually assigned QSOs (which is strongly recommended!) you may find yourself with dubious countries again and lose manual assignments. It is recommended that you use this option with caution only if you fully understand what you are doing!
- 'Extract unassigned QSOs': this option instead, attempts to determine ONLY those QSOs that do not have an assignment, i.e., those that have unknown country (???????????) or doubtful country ('***************) we suggest using this option after every CHECK update, because in addition to inserting new prefixes and possible new countries, CHECK updates often include improvements to the recognition system that might resolve some doubtful or unknown.
*** MANUAL REFRESH ***
In case the QSOs already put to Log affected by the new CHECK update are reasonably few (on an important and highly anticipated expedition usually one is not able to make more than a dozen QSOs with the DX station) one can also operate manually to "refresh" QSOs erroneously assigned to another country if entered to Log BEFORE the CHECK update.
To give a practical example, let's take VP6DX:
- Start EasyLog and open the Log to be refreshed - Select sort by CALL (drop-down list on the Log bar immediately to the right of the scanner icon) - Press the space bar to search by Call - Type VP6DX and press enter, if found, the Log sort bar will move to one of the QSOs made with VP6DX. All other QSOs with VP6DX will be shown consecutively - Then press the [ * ] (asterisk) button to the right of the DXCC country in the diplomas panel at the top left - The country will be refreshed and aligned with the new correct country, if, in the specific case of VP6DX, the QSO was made from Feb. 11 to Feb. 28 the country will be updated as DUCIE I. - Move to the next QSO with VP6DX and press [ * ] again until all QSOs with VP6DX are refreshed
Sending a Log for maintenance
In very rare cases, your Log may require our intervention. It is then important that you send us a copy of your log via e-mail.
Here's how to:
1) close EasyLog.
2) run the Backup and Restore program found in the EasyLog icon group.
3) then select the Log you want to send us.
4) select an output destination of the backup file a folder (directory) on your hard drive
5) perform the backup
When the backup is complete, in the directory you have chosen, you will find a zip file, with the same name as the Log, this is the file to attach to an electronic mail (e-mail) message.
Send this file to ik1tzo@easylog.com
Importing a Log after our maintenance
Here is how to import a Log after our maintenance.
Deleting old Log
Before importing the Log sent to you, delete the old one on your disk.
Here's how to do it:
1) start EasyLog.
2) from the main menu (top part of the window), select the "Log" tab
3) select the CLOSE menu item to close the active Log (the one you want to delete)
4) select (again from the "Log" tab) the "Delete Log" item
5) select the Log to be deleted and press the "Delete" button
6) Close EasyLog
Importing the corrected Log
1) close EasyLog if open
2) save the file attached to the e-mail we sent you, to a directory on your hard drive, we suggest C:TEMP (as pictured in step 4), or to another directory. The file zipped contains all the Log files needed.
3) launch the "BACKUP AND RESTORE" program, which you will find in the EasyLog icon group.
4) the Backup and Restore program looks like this:

5) Press the "..." button located to the right of the "Free Path" field to select the directory in which the zip file attached to the email was saved. (In the example of the image C:TEMP (or other directory))
6) press the RESTORE button and select from the window that will appear your Log to retrieve
7) press the OK button and wait. (14 files will be recovered)
8) close the BACKUP AND RESTORE program.
9) launch EasyLog
10) select the "Log" tab from the general menu, then OPEN LOG
11) select your Log and press the OK key.
12) wait for the indexes to be recreated.
At this point the Log is ready to be used.
Remote Assistance
For all problems inherent in the use of EasyLog, we are available via e-mail.
In special cases, and in any case at our discretion, we can connect your PC remotely, making the necessary checks and/or corrections to make EasyLog work properly.
To do this, you need to download the Team Viewer program (it is a free software), and run it on your PC (it requires no installation, so it won't dirty your PC).
Here is where to download Team Viewer:
Click here to download TeamViewr
The program is small, less than 10 MBytes, so you'll download it in seconds.
When the download is complete, run it.
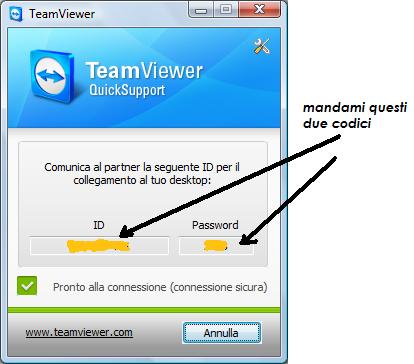
The following image shows where to find the two codes to email, to ik1tzo@easylog.com
What I need is the ID code and password.
As soon as we receive them, we will make the remote connection.
So it is necessary that TeamViewerQS is active and you are connected to the Internet.
How to proceed:
1) about ten minutes before your appointment with us, start TeamViewer and retrieve both the user ID and password and send them with an e-mail message
2) leave TeamViewer active and do not close it during the remote session. Only at the end will you be able to close it
3) wait for our remote connection to occur.
---
IMPORTANT
This service is offered by us only in exceptional cases. It is free of charge, and requires your agreement to connect. During remote operations, we will operate only and exclusively for troubleshooting particular EasyLog problems.
The service is at our discretion. This means that we are the ones to offer it, only in those cases where problems with EasyLog operation on your PC may be insurmountable for you.
It is important to note that this is not a due service and there is no obligation on our part to accept a request for remote assistance.
Please also remember that we take no responsibility in the event of a dropped connection and related problems created.
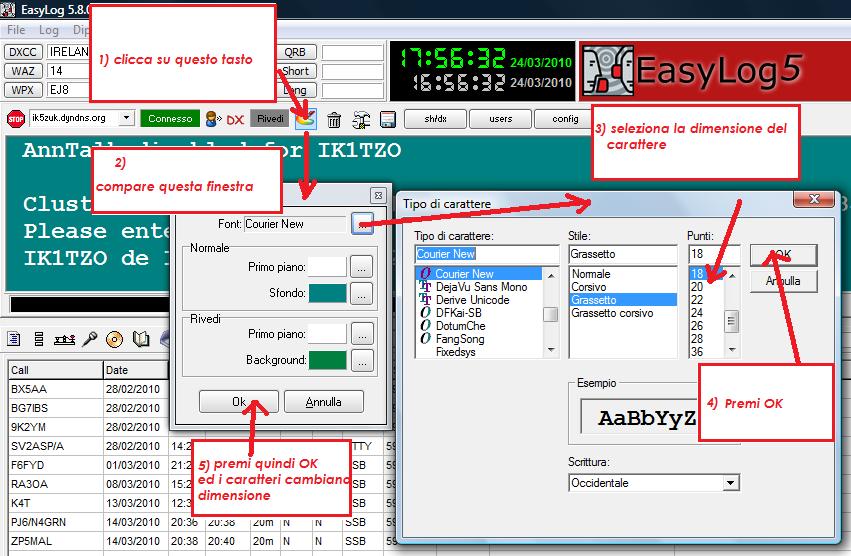
Here is how to change the font size and type, in the Cluster area:
READ CAREFULLY
Problem getting EasyLog to run on a PC with Windows 10 (upgrading Windows from previous versions)
Windows 10 version, installed as an upgrade over an earlier version (such as on Windows 8), suffers from a serious problem created by Skype communication software.
This software is automatically installed during Windows upgrade, but it freeze EasyLog and other programs.
To solve the problem, simply uninstall Skype or reinstall an earlier version than the one installed by Windows 10
Problem created by 32-bit printer driver
Another problem plagues Windows 10: in some cases, using a printer with a 32 Bit driver, EasyLog either does not start or delays very much when starting.
Unfortunately, the cause of the problem is a Windows DLL, (not working) that should emulate/convert the old 32 Bit drivers, on the new 64 Bit system.
To get around the problem, it is usually enough to unhook the active printer seen by Windows, and configure an additional dummy printer. Launch EasyLog and when it needs to print, change from dummy driver to the real driver.
The ultimate solution to the problem (pending a solution from Microsoft) is to update the drivers from the manufacturer's site, downloading 64 Bit drivers for the printer.
In case they are not there, consider to change the printer to a more modern one.
How to set MMTTY
The following link shows a PDF with details about how to configure MMTTY:
RTTY and MMTTY on 64Bit systems (Windows 7, Windows 8, and Windows 10)
Important notes for those using Windows 7, Windows 8, Windows 10.
The RTTY section of EasyLog is based on the MMTTY engine.
MMTTY is an application that communicates with EasyLog via an OCX file that unfortunately has been compiled (by the author of MMTTY) only in 32 Bit.
On 64 Bit systems, it is therefore necessary to set EasyLog to start with administrator rights.
Here's how to do it for Windows 7:
Select the EasyLog icon from the desktop (desktop) and right-click, on the EasyLog icon. The following window will appear:

Deleting a QSO
I didn't find the option, once the QSO is entered, to delete it except by overwriting it. Is this correct?
Answer:
There is an option to delete, or rather mark a QSO for deletion, using the "Delete/Recall QSO" option in the Log menu. The QSO in question will be crossed out and not considered for awards calculation.
To permanently delete it (and any other QSOs marked for deletion) use the "Delete QSO and Compact Log" option of the Utilities module.
To use the Utility, EasyLog mut be closed.
Alternatively, the method of overwriting a QSO that you want to delete with a new one is also valid.
QSLs and QSLr
Question:
In the Log area there are two options: QSLs QSLr with the choice buttons S,N,B,D. I wanted to know what their meaning is and how they should be used.
Answer:
the little buttons indicate the status of the QSLs:
S=Sent
N=Not Sent
B=Sent via bureau
D=Sent by direct route
If you do not need to specify how they were sent, you can simply use the S button
Execute EasyLog in administrator mode
IMPORTANT
Starting with Windows 7 (so also Windows 8, 8.1 and Windows 10) you must install EasyLog in Administrator mode.
If you are using a PC with Windows already installed (Windows 7 to Windows 10) and do not know if you are operating as an Administrator, we recommend the following:
1) select with the right mouse button, the EasyLog icon present on the desktop
2) select the menu item "Run as Administrator" (the description given may vary depending on the version of Windows)
At this point EasyLog will be run in Administrator mode. Since Administrator rights lapse when the PC is turned off, we suggest changing the execution settings of EasyLog by performing the following steps:
1) select with the right mouse button, the icon of EasyLog present on the desktop
2) select the "Properties" menu item (the description given may vary depending on the version of Windows) and in the "Compatibility" section select "Run as Administrator"
3) save the changes
From now on, every time the EasyLog icon is double-clicked, the program will run in Administrator mode, functioning correctly.
Hai delle altre domande? Contattaci